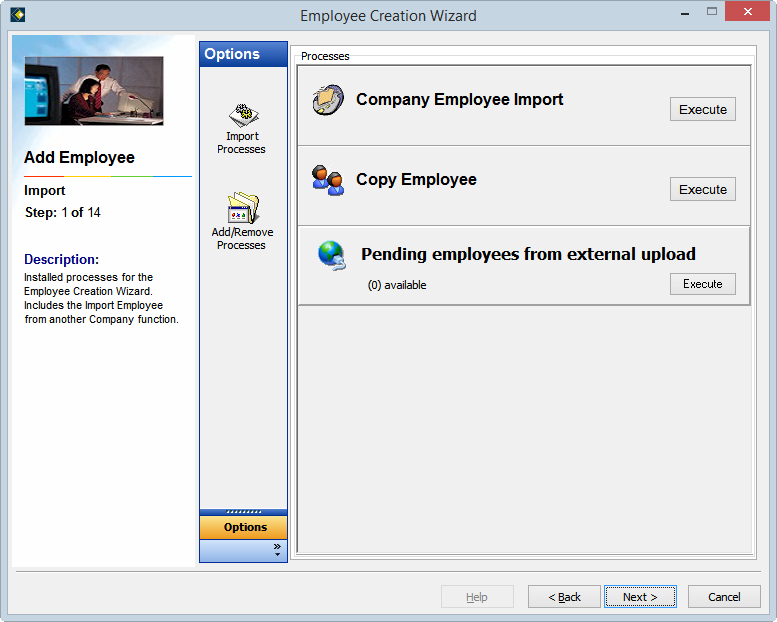
Step 1: Import
Step 1 is optional and is used to either copy or import an employee from another source. If you are creating a new employee (i.e. one who does not exist in another company), click Next to move to step 2, otherwise select the required option to run that process. There are three options to choose from:

This option can be used when employees transfer between companies, to import employee details from another company within the current database. Once you have selected the employee to import, you will be returned to this screen and must then proceed through the rest of the Employee Creation Wizard. The following rules apply:
- The employee is terminated in the source company.
- A new employee file is created in the destination company - an employee license must be available for this.
- Leave balances are transferred to the destination company with the employee details. Personal details such as name, address, characteristics, tax details, and standard hours are also imported.
- The system attempts to match specific codes such as pay items, cost centres, departments and super. If a match is found, details will be imported. If no match is found, you will need to manually adjust these settings as you go through the wizard.
- Year to date figures remain in the source company. A payment summary must still be produced from the source company, however you may Archive the employee in the source company so that they no longer take up a license in the source company.
Perform the following steps to import an employee:
- At step 1 of the Employee Creation Wizard, click Execute next to Company Employee Import.
- The Import Employee Wizard opens. Click Next to continue.
- In the
local search screen, select the company from where you want to import the employee.
- In Search Containing the Text, search for the employee by name or number.
- Click Start Search to find your employee.
- Select the required employee on the right to begin the import process.
- Step 3 shows the progress of the import process, including settings that it is "Unable to Match"..
- Click Export if you wish to save a log of these details.
- Click OK to return to the Employee Creation Wizard.
- Click Next to go to step 2 of the wizard, then proceed through each step of the wizard to confirm the imported detail.
- Upon completion of the Import Wizard the final screen will prompt "Archive this employee in the source company?" Click Yes to prevent the employee in the source company from counting towards your HR3pay license.
![]() The wizard attempts to match
settings such as cost centres, departments or employment conditions
Any settings which cannot be matched are listed as 'unable to match'. You will be able to complete these settings as you proceed with the employee
creation wizard.
The wizard attempts to match
settings such as cost centres, departments or employment conditions
Any settings which cannot be matched are listed as 'unable to match'. You will be able to complete these settings as you proceed with the employee
creation wizard.
This option is used to create a new employee file using an existing employee as a template. You may only create a copy of an employee within the same company. Once you have selected the employee to copy, you will be returned to this screen and must then proceed through the rest of the Employee Creation Wizard.
The following rules apply:
- The process copies only non-personal details from the source employee file. This includes details such as employment conditions, pay points, standard hours, rates and pay items.
- The destination employee file will require personal details to be completed, such as name, address, tax details, hired date, bank accounts etc.
- There is no effect on the source employee file - it is simply used as a template.
- The system attempts to match specific codes such as pay items, cost centres, departments and super. If a match is found, details will be copied. If no match is found, you will need to manually adjust these settings as you go through the wizard.
- An employee license must be available for the new employee file.
To copy an employee:
- At step 1
of the Employee Creation Wizard,
click Execute in the Copy Employee Area.
The Copy Employee Wizard opens at step 1. - Click Next to proceed.
- In Select a Company, ensure that your current company is selected.
- In Search Containing the Text, search for the employee by name or number.
- In the right hand pane, select the employee record to begin the copy process.
A progress window shows each stage of the copy process. - Optionally, click Export to save and print a log file. This can be used to check settings as you move through the wizard.
- Click OK to return to step 1 of the employee creation wizard, then proceed through each step of the wizard to confirm the copied details.
- At Step 1 of the Employee Creation Wizard, click
Execute next to Pending employees from external upload.
In the window displayed, you will see a list of employee records which have been partially created in an external source. - Highlight the required employee in the list and click Select. You will be returned to step 1 of the Add Employee Wizard.
- Click Next, then proceed through each step of the wizard to confirm the imported details.
Go to Step 2.
